At some point during a normal validator’s lifecycle, you will want to exit and potentially obtain your balance back, the initial deposit plus any remaining rewards, assuming you have a withdrawal address associated with your validator. This document will guide you through some steps to perform a voluntary exit of your validator.
This guide is meant for people who are staking on Ethereum either through their own node or with a non-custodial service. It will explain in details which steps or actions you should take in order to perform a voluntary exit.
There are a lot of different ways to perform a voluntary exit. Each consensus client has their own documentation on this. This guide will focus on using ethdo and the beaconcha.in website to perform this task for simplicity. Check out the documentation for each client to learn more about how to do this natively.
A video tutorial of this guide can be seen on https://youtu.be/KoBAacMWA_k .
We will use 3 tools with this guide: ethdo, the beaconcha.in broadcast tool and Tails.
ethdo is a command-line tool for managing common tasks in Ethereum. In this guide, we will use it to sign your voluntary exit from all the validator details we will provide.
beaconcha.in is an open-source Ethereum explorer. In this guide, we will use it to broadcast the voluntary exit using their Broadcast Signed Messages tool.
Tails is a portable operating system that protects against surveillance and malicious actors. In this guide, we will use it to perform all the sensible operations offline to prevent exposing your secrets.
The first step will be to prepare and generate a file for offline signing using ethdo. The second step will be to boot a computer into Tails, sign and generate your voluntary exit file using ethdo. The third step will be to broadcast this voluntary exit. You will need 2 USB sticks, one to boot the Tails operating system from and the second one to hold ethdo and the documents we will need. You will also need a PC that supports AMD64 instructions to boot into.
To perform a voluntary exit, you need the validator signing key. This can be obtained through 2 main ways, either with your mnemonic, the 24 words used to create your validator keys, or with the keystore file and the associated password. If you do not have either of them, you are likely out of luck and you are unlikely to ever be able to perform a voluntary exit.
You will also need the validator public key or the validator index as identified by the beacon chain. Both of these can be found on the beaconcha.in website. You can find your validator’s page by searching by public key, deposit address, validator index or a few other ways. From there, you should be able to find your validator index or public key at the top of the validator’s page.
NEVER enter your mnemonic into a machine that was or will be online. This would potentially expose you to a malicious actor stealing your money.
For most of this guide, we will use ethdo version 1.35.2. You should use the latest stable version available from https://github.com/wealdtech/ethdo/releases and adapt this guide to that latest version if a new version is released.
Using ethdo, we will connect to a beacon node endpoint and create a file named offline-preparation.json to be used later. If you do not have direct access to your own beacon node endpoint, ethdo will fallback using its own public endpoint assuming you are connected to the internet.
Open a powershell command prompt, press ⊞ Win+R, type powershell and press ↵ Enter. You will see a blue or black window where you can type commands.
Download the etho archive and the associated checksum file.
$ProgressPreference = 'SilentlyContinue'; iwr https://github.com/wealdtech/ethdo/releases/download/v1.35.2/ethdo-1.35.2-windows-exe.zip -outfile ethdo-1.35.2-windows-exe.zip
$ProgressPreference = 'SilentlyContinue'; iwr https://github.com/wealdtech/ethdo/releases/download/v1.35.2/ethdo-1.35.2-windows-exe-zip.sha256 -outfile ethdo-1.35.2-windows-exe-zip.sha256
Compute the archive hash value and compare it to the expected value.
Get-FileHash .\ethdo-1.35.2-windows-exe.zip | Select -Property @{n='hash';e={$_.hash.tolower()}} | Select -ExpandProperty "hash"
cat .\ethdo-1.35.2-windows-exe-zip.sha256
Both of these output values should match. As of today and for version 1.35.2, they should both be 0751df69b2cbe26a418f4bb0d1ef660b6c0d5e98dfceff4ed491a382ac04974f. If they do not match, there might be a security issue and you should seek further support.
Extract the ethdo archive and generate the preparation file.
Expand-Archive .\ethdo-1.35.2-windows-exe.zip
cd .\ethdo-1.35.2-windows-exe\
.\ethdo.exe validator exit --prepare-offline
You should see a message saying offline-preparation.json generated if everything worked fine.
Download the Linux version of ethdo as well to prepare for when we will need to execute this offline on Tails.
$ProgressPreference = 'SilentlyContinue'; iwr https://github.com/wealdtech/ethdo/releases/download/v1.35.2/ethdo-1.35.2-linux-amd64.tar.gz -outfile ethdo-1.35.2-linux-amd64.tar.gz
$ProgressPreference = 'SilentlyContinue'; iwr https://github.com/wealdtech/ethdo/releases/download/v1.35.2/ethdo-1.35.2-linux-amd64.tar.gz.sha256 -outfile ethdo-1.35.2-linux-amd64.tar.gz.sha256
Open an explorer window in this current directory to easily access the files we just obtained.
start .
Open a terminal. Download the etho archive and the associated checksum file.
curl -O -L https://github.com/wealdtech/ethdo/releases/download/v1.35.2/ethdo-1.35.2-darwin-amd64.tar.gz
curl -O -L https://github.com/wealdtech/ethdo/releases/download/v1.35.2/ethdo-1.35.2-darwin-amd64.tar.gz.sha256
Make sure ethdo checksum matches.
shasum -a 256 ethdo-1.35.2-darwin-amd64.tar.gz
cat ethdo-1.35.2-darwin-amd64.tar.gz.sha256
Both of these output values should have matching checksum. As of today and for version 1.35.2, they should both be c6014dc1f075274af1f9ce9441d63b775772f21d4d3abfc7e4198e98f3a3b9b8. If they do not match, there might be a security issue and you should seek further support.
Extract the ethdo archive and generate the preparation file.
tar xvf ethdo-1.35.2-darwin-amd64.tar.gz
./ethdo validator exit --prepare-offline
You should see a message saying offline-preparation.json generated if everything worked fine.
Download the Linux version of ethdo as well to prepare for when we will need to execute this offline on Tails.
curl -O -L https://github.com/wealdtech/ethdo/releases/download/v1.35.2/ethdo-1.35.2-linux-amd64.tar.gz
curl -O -L https://github.com/wealdtech/ethdo/releases/download/v1.35.2/ethdo-1.35.2-linux-amd64.tar.gz.sha256
Open an finder window in this current directory to easily access the files we just obtained.
open .
Open a terminal. Download the etho archive and the associated checksum file.
wget https://github.com/wealdtech/ethdo/releases/download/v1.35.2/ethdo-1.35.2-linux-amd64.tar.gz
wget https://github.com/wealdtech/ethdo/releases/download/v1.35.2/ethdo-1.35.2-linux-amd64.tar.gz.sha256
Make sure ethdo checksum matches.
sha256sum ethdo-1.35.2-linux-amd64.tar.gz
cat ethdo-1.35.2-linux-amd64.tar.gz.sha256
Both of these output values should have matching checksum. As of today and for version 1.35.2, they should both be 047a05eed50f03299cc64a3fdfa7e8111c7e23c41a066699ef66740d95044805. If they do not match, there might be a security issue and you should seek further support.
Extract the ethdo archive and generate the preparation file.
tar xvf ethdo-1.35.2-linux-amd64.tar.gz
./ethdo validator exit --prepare-offline
You should see a message saying offline-preparation.json generated if everything worked fine.
If you are having issues creating your offline-preparation.json, you can use these alternative files. They are regenerated every day at 0:00 UTC. You will need to extract the archive first (either the .tar.gz file on Linux or macOS or the .zip file on Windows) to get the offline-preparation.json file.
For Mainnet:
For Holesky:
Copy those files on your second USB stick.
offline-preparation.jsonethdo-1.35.2-linux-amd64.tar.gzethdo-1.35.2-linux-amd64.tar.gz.sha256If you want to use your keystore file and the associated password to generate your voluntary exit file, make sure to copy the keystore file on the same USB stick that you put the offline-preparation.json file. Try avoiding entering the associated password in a file on the same USB stick in clear text.
If instead you want to use your mnemonic to generate your voluntary exit, avoid entering it in a file on your USB stick. Try to keep it away from any electronic document and any electronic medium. If you have it on a paper or in steel, keep it close as we will need it in the next step.
Install Tails on your first USB stick which should be empty by following the instructions from their website. Unplug any wired connection and restart a machine on your Tails USB stick. During start, you will be asked to select your language, keyboard layout and formats. Click Start Tails to reach the Desktop.
Plug in your second USB stick and copy all the documents and tools we included in the home folder.
Start a terminal. Make sure ethdo checksum matches.
sha256sum ethdo-1.35.2-linux-amd64.tar.gz
cat ethdo-1.35.2-linux-amd64.tar.gz.sha256
Both of these output values should have matching checksum. As of today and for version 1.35.2, they should both be 047a05eed50f03299cc64a3fdfa7e8111c7e23c41a066699ef66740d95044805. If they do not match, there might be a security issue and you should seek further support.
Extract the ethdo archive.
tar xvf ethdo-1.35.2-linux-amd64.tar.gz
From here you can either use your keystore file and the associated password or use your mnemonic to generate your voluntary exit file.
There are 3 inputs for the next command that will generate your voluntary exit file.
As a template, the command call looks like:
./ethdo validator exit --validator="KEYSTORE_FILENAME" --passphrase='KEYSTORE_PASSWORD' --json --offline > RESULTING_FILENAME
Here is a concrete example of using this command.
./ethdo validator exit --validator="keystore-m_12381_3600_0_0_0-1679368539.json" --passphrase='testing123' --json --offline > 459921-exit.json
In this example, it would result in a file named 459921-exit.json in your home folder for performing the voluntary exit of the validator that is using the imported keystore file.
Copy that resulting file back on your second USB stick. We will need it on the next step to broadcast the voluntary exit.
There are 3 inputs for the next command that will generate your voluntary exit file.
As a template, the command call looks like:
./ethdo validator exit --validator=VALIDATOR_INDEX --json --offline --mnemonic="MNEMONIC" > RESULTING_FILENAME
Here is a concrete example of using this command.
./ethdo validator exit --validator=459921 --json --offline --mnemonic="silent hill auto ability front sting tunnel empower venture once wise local suffer repeat deny deliver hawk silk wedding random coil you town narrow" > 459921-exit.json
In this example, it would result in a file named 459921-exit.json in your home folder for performing the voluntary exit of validator 459921.
Copy that resulting file back on your second USB stick. We will need it on the next step to broadcast the voluntary exit.
Shut down Tails and go back to your main connected machine. Plug your second USB stick. Browse to https://beaconcha.in/tools/broadcast, the beaconcha.in broadcast tool. Drag and drop or select your voluntary exit json file on that website from your USB stick. Click the Submit & Broadcast button.
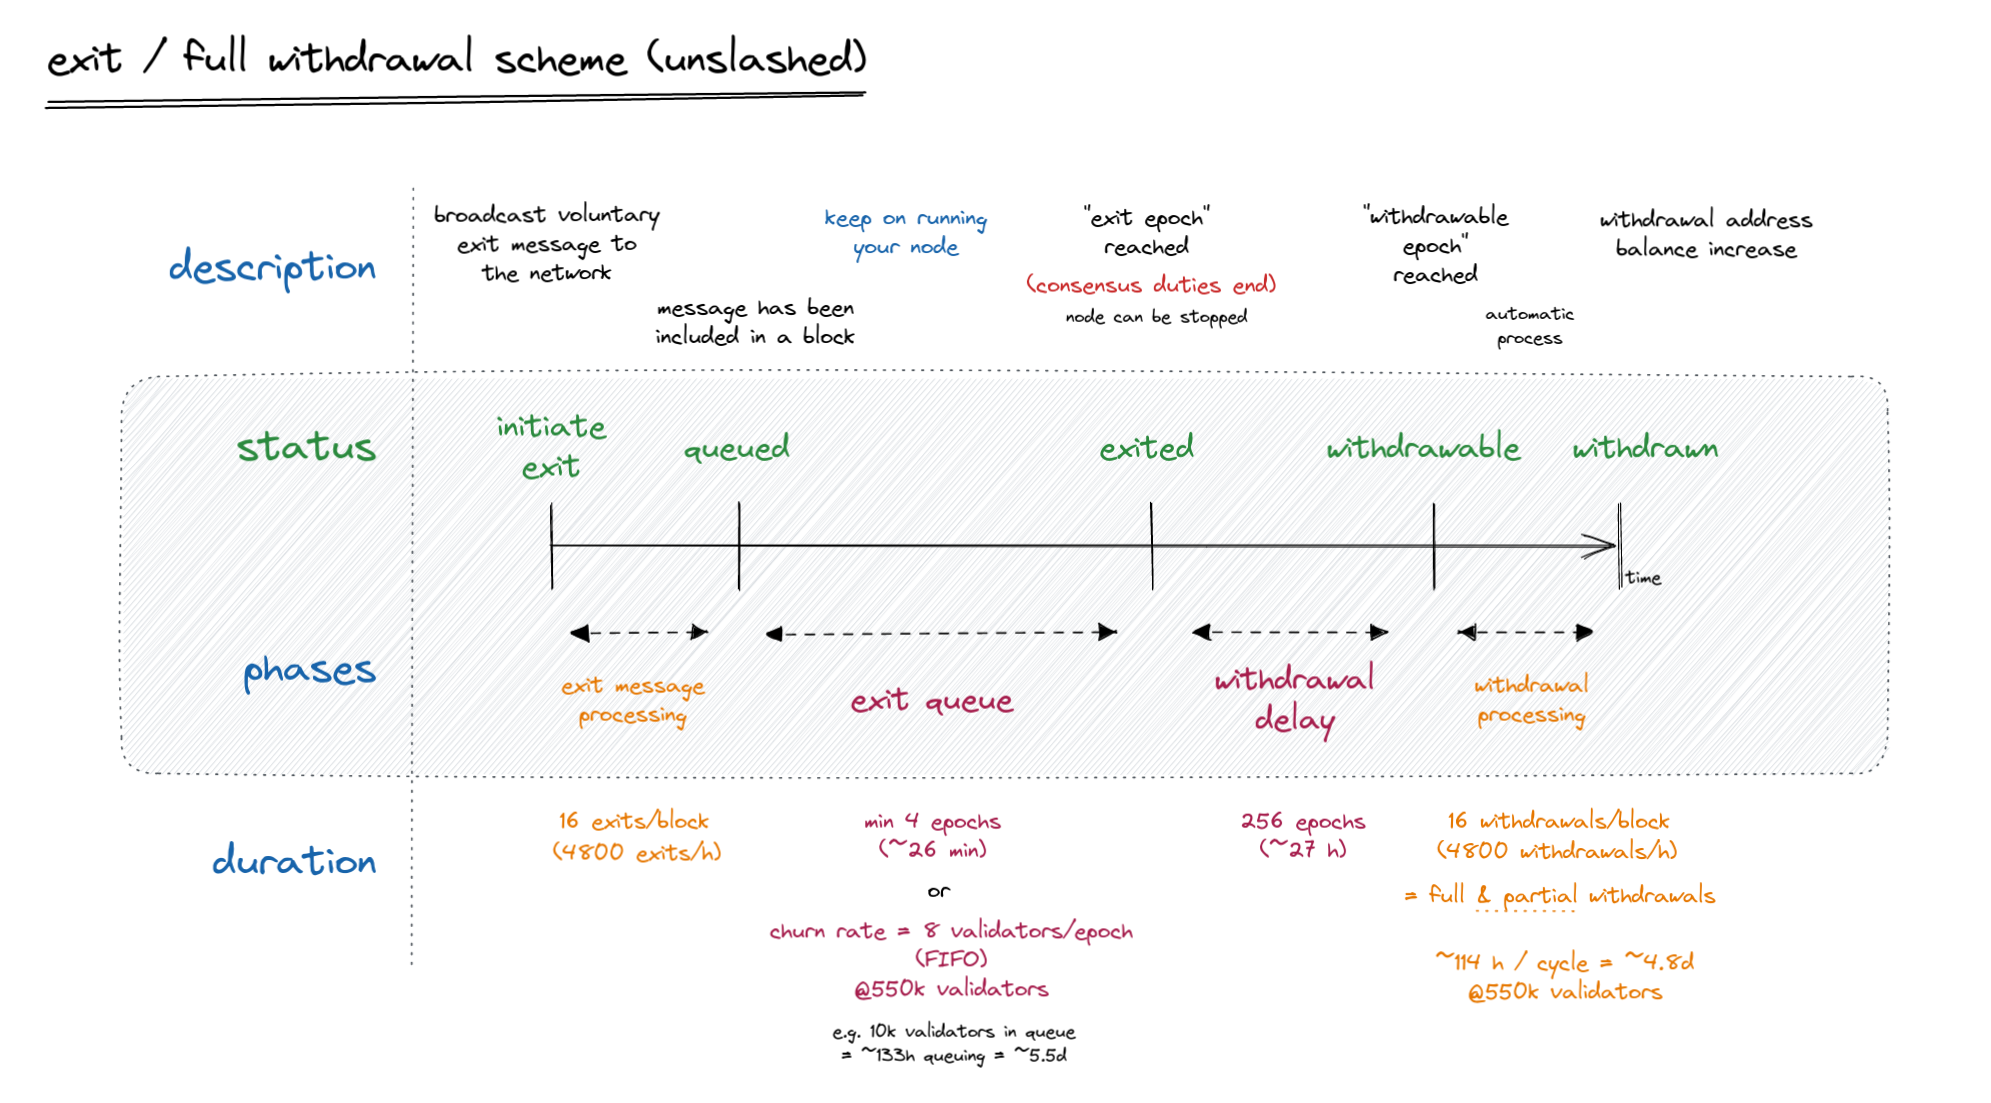
Your validator will enter the exit queue and it will eventually fully exit the network. Your validator is expected to perform its duties even after you broadcast your voluntary exit. Make sure to let your validator run and perform its regular duties as long as it’s not fully exited.
If you have access to a beacon node, a consensus client currently in sync with an exposed beacon node API endpoint, you can manually submit your voluntary exit with that beacon node. That alternative process is usually harder than just using beaconcha.in broadcast tool. If you have a node running under Linux this can be done with the curl tool on the command line interface. You will need your voluntary exit file on the machine where you want to execute this command.
There are 2 inputs for the next command that will broadcast your voluntary exit using a beacon node.
As a template, the command call looks like:
curl -X POST BEACON_NODE/eth/v1/beacon/pool/voluntary_exits -H "Content-Type: application/json" -d @EXIT_FILE
Here is a concrete example of using this command.
curl -X POST http://localhost:5052/eth/v1/beacon/pool/voluntary_exits -H "Content-Type: application/json" -d @459921-exit.json
There are multiple steps and delays when performing a voluntary exit and waiting for the final withdrawal. Check out this great graphic by Ladislaus to find more about those steps.
If you have any question or if you need additional support, make sure to get in touch with the ethstaker community on: